|
3/21/2018 0 Reacties Cook It : Hainanese Chicken RiceHainanese chicken rice is a dish originally from the Hainan province in southern China. It is considered one of the national dishes of Singapore. Hainanese chicken rice is most commonly associated with Singaporean, Malaysian and Hainanese cuisines, although it is also popular in Thailand (where it is known as Khao Man Gai), Vietnam and Indonesia. Now I must confess right now that I am no domestic goddess. Hell no! I DO NOT belong in the kitchen. My Husband is a way better cook than me AND he does ALL the housework. (Did I marry a maid???) But for some bizarre reason, during my pregnancy, I had this urge to cook and bake lots – apparently it’s a phenomenon called “nesting”.Basically, what I am trying to say is that – If I can cook Hainanese Chicken Rice, ANYONE CAN!!! There were quite a few steps in the recipe and I had to get down and dirty with some chicken legs (oo-er!) plus there was lots of chopping… 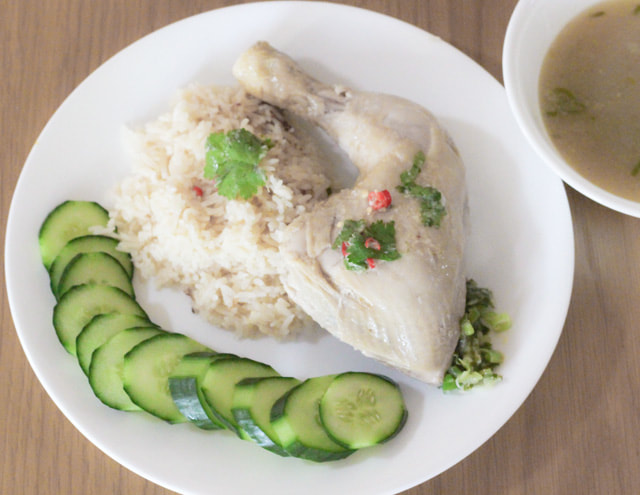 Hainanese Chicken Rice for 4 persons Preparation time: about one hour Cooking: 50 minutes, plus 30 minutes resting (important!) The ingredients Chicken (+/- 1.5kg) 5 whole cloves garlic, plus 2 chopped cloves 6 unpeeled, thick slices of ginger 1 tbsp of sesame oil 700g jasmine rice 1/2 tsp of sea salt 1 tbsp soy sauce + coriander, sliced cucumber and spring onion, to serve The chili Sauce 6 red birds-eye chilies 2 tbsp of grated ginger 2 garlic cloves 1 tsp caster sugar 1/4 tsp sea salt flakes 1 tsp lemon juice Spring onion and ginger oil 4 thinly slicedspring onions 2 tbsp grated ginger 1/2 tsp sea salt flakes 3 tbsp peanut oil The dressing 1 tbsp sesame oil 2 tbsp light soy sauce Trim any visible fat from the chicken. Roughly chop the fat and put in a small saucepan. Cook over very low heat for about one hour until the liquid fat renders away. Pour off and keep the liquid fat as it pools. (You do not need the crispy pieces of fried fat for this dish, but they are excellent served over cooked noodles.) Put the whole garlic cloves and five slices of ginger in the cavity of the chicken and place breast-side down in a large pot. Cover with water and bring to just below a simmer. The water should be steaming well, but not bubbling. Keep the heat at this stage for 20 minutes, then cover the pot and turn off the heat. Leave for 30 minutes, then lift out the chicken, keeping the poaching stock. Brush the chicken skin with sesame oil and wrap with plastic wrap. The chicken should be cooked very lightly, pink inside the bones and with a gelatinous skin. Heat 1 tbsp of the chicken fat in a large saucepan over medium heat. Add the chopped garlic and remaining 2 slices of ginger and stir-fry until fragrant. Add the rice and toss until well coated and turning opaque. Add 1.25 litres of the reserved chicken stock, the salt and soy sauce. Cook in a rice cooker. To make the chili sauce, combine chilies, ginger, garlic, sugar and salt in a mortar and pound to a paste. Add the lemon juice and 1-2 tablespoons of hot chicken stock and pound again. Set aside. To make the spring onion and ginger oil, add the spring onion, ginger and salt to a heatproof mortar and pound lightly. Heat the oil in a small frying pan and pour onto the mixture. Once the sizzling stops, combine lightly with the pestle and leave to infuse for a few minutes. To make the dressing, mix the sesame oil and soy sauce with 60 ml of the chicken stock. If you have any remaining chicken stock, you can season it and add a few onion slices. This can be served as a light broth to accompany the meal. Slice the chicken and pour the dressing over it. Scatter with a bit of coriander and serve with the rice, condiments, broth and garnishes. I adapted this recipe (by adapted, I mean SIMPLIFIED and CUT CORNERS because I am time poor (read: too lazy)). So I adapted it by using drumsticks instead of a whole chicken and I got bored before I managed to make the chilli sauce so I just sprinkled red chillies on top of the chicken as garnish, haha!!! The chicken rice was YUMMY (I told you I wasn’t a food blogger!) and full of chicken-y flavour and the chicken meat was succulent and moist. But yeah, it needed a chili sauce kick so next time, I will just buy ready-made chili sauce to go with it...
Who else loves chicken rice?
0 Reacties
When things are quiet on the blog, it’s guaranteed to mean that “real life” is hectic. Anyway, even when life has been busy, I have found time to make scones. Not once, but twice. Life just tastes better with scones smothered in strawberry jam and cream!! I thought I would share this SUPER EASY 3 ingredients scone recipe because it is simply scrumptiously delish and it is ridic how easy it is to bake! Remember, I am NOT a domestic goddess and I “wing” a lot of things in the kitchen and I need failproof recipes and this is one of them. Do yourself a favour today and bake these! Your happy tummy can thank me later. Ingredients 1. 3 cups self-raising flour 2. 1 cup cream 3. 1 cup lemonade (4. Add a pinch of salt – optional – but I skipped it) 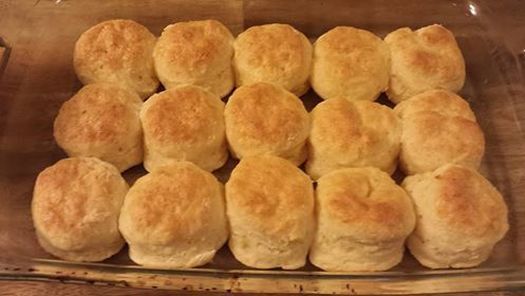 Lemonade Scones Method 1. Turn on your favourite jam. There’s nothing more fun than singing, doing daggy dance moves and baking at the same time! Preheat oven to 220°C. 2. Sift flour (and salt) into a large bowl and make a hole in the middle. Pour the cream into the hole. Then pour the lemonade in and watch it fizzle like a chemistry experiment. Pretty cool stuff. 3. Use a knife or spatula to mix it together until the flour is incorporated with the wet stuff. It doesn’t matter if it looks lumpy. 4. Lightly flour your hands and a flat surface (I used a chopping board) and put the dough on there. Gently pat it together until it looks less lumpy and about 1.5cm thick. Don’t knead it too much because it makes them less fluffy and more tough. 5. Then using a lightly floured scone cutter (or use a drinking glass rim), stamp out those scones. Depending on the size of the scone cutter, you will probably get 8-16 scones. I got 7 scones in one batch because I like mine big (that’s what I said!) but my hubby said he likes them smaller so I’m going to use a smaller scone cutter next time. 6. Place them onto a baking tray lined with greaseproof paper. Place them quite close to each other but not quite touching (they will touch each other when they expand in the oven – that’s a weird sentence to write!!). And then, brush some cream/lemonade residue from the measuring cup (or if you cleaned it out, make a wee mix), on top of each scone because it makes a nice golden semi-sweet crust. 7. Bake for 10-15 minutes (the time will vary depending on the size of your scones so just keep your eyes on them). Whilst the scones are baking, whip up plenty of cream to serve with your scones later. 8. When the scones are on the verge of being done, turn on the kettle to make a cuppa tea. Get everything set out on the table – butter, jam, cream, tea, cutlery – so you can dig in when the scones are fresh out of the oven and still lovely and warm. You can also cover them with a tea towel to keep them nice and toasty – but I avoid kitchen towels because I have an aversion to them because of germs and all that jazz. I’m so weird, huh! These lemonade scones are light, fluffy and more-ish. Super cheap (to make your own), super easy, super yummy – what’s not to love?
If you have any leftovers, just pop them in a zipper storage bag. And when you want to eat them, cut them in half and pop them in the microwave for up to 30 seconds. Probably last for 2-3 days, but we usually demolish all the scones within 2 days, haha. P.S. I know I have listed SOOO many steps but it is because I am rambling and adding unnecessary commentary. |
AuteurPascale Loveniers & Drs. Christiaan Janssens Archieven
Maart 2018
Categorieën |
 RSS-feed
